25 Şubat 2013 Pazartesi

JustJenn's New Year Oshogatsu Feast 2013

To contact us Click HERE
JustJenn's New Years Oshogatsu - 2013New Year's Feast at JustJenn's House!
My friend JustJenn cooked, baked, and then cooked & baked some more! She hosts a great New Year's Oshogatsu feast on New Year's day. Fun times!

Here is JustJenn's post about it as well as the recipes. I'll just leave you with some photos so you can get jealous. I mean, enjoy the deliciousness with me.

JustJenn's New Years Oshogatsu - 2013
What a spread!!!
JustJenn's New Years Oshogatsu - 2013Shrimp salad

JustJenn's New Years Oshogatsu - 2013Sushi from old school Sakae Sushi in Gardena

JustJenn's New Years Oshogatsu - 2013Somen salad

JustJenn's New Years Oshogatsu - 2013JustJenn's New Years Oshogatsu - 2013
JustJenn's New Years Oshogatsu - 2013Root beer pulled pork, guava jelly chicken wings and tamale pie... perhaps not enjoyed by our samurai ancestors in Japan, but us Japanese Americans put our own spin on things.

JustJenn's New Years Oshogatsu - 2013Guava jelly chicken wings

JustJenn's New Years Oshogatsu - 2013You had to save lots of room for dessert - homemade an mochi, brownie mochi, mochi bundt and broken glass bundt!

JustJenn's New Years Oshogatsu - 2013I brought a bundt, of course! And the mochi in the ozoni soup was from our annual mochi making day.

Thanks for a delicious New Years lunch, JustJenn. What a great way to start the year!

For more info and recipes, see JustJenn's post! Also, don't forget that JustJenn has a MOCHI COOKBOOK! From sweet to savory - find it on Amazon.


Pin It!

Caramel Cake - Book Review and Giveaway - Basic to Brilliant, Y'all

To contact us Click HERE

When the ever-charming Virginia Willis sent me her Basic to Brilliant, Y'all for review, I couldn't decide which recipe to make first. Of course, the Mini Country Ham Cheddar Biscuits caught my Southern-on-my-father's-side eye. And the Southern Salad Macedoine. And lots of wonderful seafood dishes. Then I came to page 252 and my Southern grandmother's cake jumped out at me! 

The version in Basic to Brilliant, Y'all is the one Virginia's grandmother made. It's a three-layer cake, but since my grandmother made hers with just two layers, I used only two. It's always nice to have a layer in the freezer for a rainy day, isn't it!

Never much of a candy fan, I've never bought a candy thermometer for my well-equipped kitchen. But my trusty Splash-Proof Super-Fast Thermapen Instant Read Thermometer works beautifully for this; no need for a thermometer that clips to the pan, but you will need a thermometer.

Besides wonderful recipes, each with an optional "brilliant" touch to add to the "basic" recipe, you will find lots of stories about the author's Southern childhood and her time in France. 

The drool-worthy pictures by photographer Helene Dujardin next to Virginia's delectable recipes make this book hard to read without getting hungry!

Dede's Burnt Caramel Cake

(Makes three 9-inch layers)

1 cup (2 sticks) unsalted butter, room temperature, plus more for the pans
3 cups all-purpose flour, plus more for the pans
1 teaspoon baking powder
2 cups sugar
4 large eggs, room temperature, well beaten
1 cup whole milk
1 teaspoon pure vanilla extract
Burnt Caramel Icing

Preheat oven to 350 degrees. Butter and flour three 9-inch round cake pans and line the bottoms with waxed or parchment paper. Butter and flour the paper. Sit together the flour and the baking powder.

In the bowl of a heavy-duty mixer fitted with the paddle attachment, cream the butter and sugar on medium speed until light and fluffy, about 3 minutes. Add the flour mixture [and the wet mixture] to the butter-sugar mixture, alternating between the dry and wet ingredients in three portions, starting and ending with the dry ingredients. Pour into the prepared pans.

Bake until a cake tester inserted into the center of each cake comes out clean and the cakes start pulling away from the sides of the pans, about 25 minutes. Remove to a rack to cool slightly. Invert onto the rack to cool completely.

To assemble the cake, place one cake layer on a cardboard cake round. Spread with the still-warm frosting. Repeat with remaining layers, placing the final layer bottom side up. Working quickly, use a small off-set spatula to spread the icing gently around the cake. Let stand for 2 hours to allow the icing to set before serving. Store in an airtight container for up to 1 week.

Burnt Caramel Icing

(Makes about 2 cups)

2 1/2 cups sugar
1/2 cup (1 stick) unsalted butter
1 cup heavy cream, plus more if needed to loosen
2 teaspoons pure vanilla extract
1/4 teaspoon fine sea salt

In a heavy cast-iron skillet, heat 1/2 cup of the sugar over medium-high heat. Stir until dissolved, then do not stir again; simply shake the pan occasionally until the mixture reaches the caramel stage, 320 to 335 degrees, on a candy thermometer.

Meanwhile, in a heavy saucepan, combine the remaining 2 cups sugar, the butter, and the cream. Bring to a boil, stirring occasionally.

When the sugar reaches the caramel stage, immediately pour it into the cream mixture and stir to combine. Cook over medium heat, stirring once or twice, until the mixture reaches the soft-ball stage, 232 to 240 degrees. Remove from the heat; add the vanilla and salt and stir to combine. Place on a rack and set aside until just cool enough to touch, 10 to 15 minutes.

Transfer the mixture to the bowl of a heavy-duty mixer fitted with the whisk attachment. Beat on high speed until creamy, 5 to 7 minutes. Place the bowl of icing in a bowl of warm water to keep it loose and fluid while frosting the cake. If it starts to set too firmly, you may need to add warm heavy cream to loosen it.

Recipe reprinted by permission from Basic to Brilliant, Y'all: 150 Refined Southern Recipes and Ways to Dress them Up for Company, copyright © 2011. Published by Ten Speed Press, a division of Random House. Photo credit: Helene Dujardin © 2011. For more information visit www.virginiawillis.com.

That's the "basic;" you'll have to buy the book to get the "brilliant"!


Basic to Brilliant, Y'all Giveaway
One winner will receive a copy of Basic to Brilliant, Y'all from Ten Speed Press. All residents of the continental United States (apologies to my international readers) who enter before 11:59 pm Eastern time Wednesday December 26 will be put into a random drawing. Two additional ways to enter below - three chances to win! Winner will be announced here in the comments before noon Eastern time on Thursday December 27. If I don't hear back from the winner of the random drawing by 11:59 am Eastern time Sunday December 30, another drawing will be held and a new winner selected from the original entrants (those who commented before the giveaway deadline).

Buy It Now Basic to Brilliant, Y'all is available online at Amazon. 

To enter the contest, please:
  • post a comment below (and please include your email address in the body of your comment); also, it would be gracious to post a comment on the author's blog.
Two additional ways to enter (for a total of 3 chances):
  • follow @VirginiaWillis on Twitter and post a comment below that you have done so.
  • follow @delightfulrepas on Twitter, tweet about the contest by copying and pasting the following: Entered to win a copy of Basic to Brilliant, Y’all @delightfulrepas http://delightfulrepast.blogspot.com #cookbook #giveaway - (AND post a comment below that you have done so.)
Disclosure: The book for this giveaway is being provided by Ten Speed Press. I was given a copy of Basic to Brilliant, Y'all for review, and all opinions shared are my own.

French Onion Soup - Soupe a l'Oignon Gratinee

To contact us Click HERE

When I took the time to thoroughly caramelize the onions for a special version of my Vegetable Beef Soup last week, I got to craving classic French onion soup. Ever since my mother and I watched Julia Child make it on television when I was a child, I've intended to make it. Every time I have it in a French restaurant, I've intended to make it. For some reason, I never have. But, at last, today was the day! 

Naturally, I started with Julia's version in Mastering the Art of French Cooking - Volume One. And, just as naturally, I couldn't help making a few additions and subtractions as well as streamlining the directions. There's nothing difficult about it. It just takes a little patience and some good broth or stock. If you don't want to take at least 45 minutes to properly caramelize the onions, don't make this soup. If you don't want to make homemade beef stock or buy some really good stock or broth, don't make this soup. 

I used Pacific Natural Foods organic beef broth, a superb product I always have in the pantry, and it was wonderful! Good, flavorful, not-too-salty broth or stock is key to this soup. And there are plenty of recipes out there shortcutting the cooking of the onions. Don't you believe them! 

We have many weeks of Soup Weather ahead - tell me about your favorite soups.

French Onion Soup - Soupe a l'Oignon Gratinee

Adapted from Mastering the Art of French Cooking

(Makes 7 cups / 6 servings)

1 1/2 pounds yellow onions, quartered and thinly sliced
2 tablespoons unsalted butter
2 tablespoons extra virgin olive oil
1 teaspoon salt
1/2 teaspoon sugar
3 tablespoons unbleached all-purpose flour
1/4 cup dry sherry
1 quart very good beef broth or stock
1 quart water

1/4 teaspoon dried thyme leaves
1/4 teaspoon dried marjoram
1/4 teaspoon coarsely ground black pepper
3 tablespoons brandy, optional
6 rounds of hard-toasted French bread
1 1/2 cups grated Swiss cheese
6 tablespoons shredded Parmesan

1 In heavy-bottomed large pot (a 4-quart is fine, but I used my Le Creuset 5.5-Quart French Oven), cook the onions in butter and oil over low heat, covered, for 15 minutes. No need to watch them, just set the timer and walk away.

2 Stir in the salt and sugar (helps with browning). Cook, uncovered, over moderate heat (onions should be sizzling), stirring frequently,* for about 35 to 45 minutes, or until onions are well caramelized, evenly golden brown.

* Who even knows what "stirring frequently" means? I've never seen a definitive answer to that question, so I'm going to say it means every 2 or 3 minutes (though maybe every minute toward the end).

3 During the last 15 minutes of cooking the onions, bring the stock and water to a boil in a 3-quart saucepan.

4 Sprinkle flour over the caramelized onions. Cook, stirring, for 2 minutes. Stir in the sherry, and cook for 1 minute.

5 Off heat, stir (gradually at first) the boiling liquid into the onions. Stir in the thyme, marjoram and black pepper (and the brandy, if you're using it). Simmer, partially covered, for 30 minutes. Taste and adjust seasoning (at this point, I added another 1/4 teaspoon each salt and pepper). May be made ahead to this point, cooled and then refrigerated until ready to use. While soup is simmering, cut slices of French bread to fit your broiler-proof* soup bowls and toast them on a baking sheet in the oven until they are hard as well as toasted. 

6 About 10 minutes before serving, preheat broiler. Bring the soup to a boil, then ladle into broiler-proof soup bowls. Place toast rounds on top, and spread cheeses over each. Place on a large, foil-lined baking sheet and put under the broiler for about 2 minutes to melt cheese and brown the tops.

*If your bowls are not broiler-proof, after oven-toasting the bread just top the toasts on the baking sheet with cheese and pop them under the broiler until cheese is bubbling and browning, then float them on the bowls of soup.

Note: If you're a Julia Child fan, you might enjoy reading my Vegetable Quiche post about one of my conversations with her.  

Pineapple Rice with Cilantro and Lime

To contact us Click HERE
Tangy, sweet pineapple rice is a unique side dish that was inspired by this Hawaiian Huli Huli Chicken. I wanted something sweet and just a bit tangy and the rice worked out beautifully. This would also be delicious with Salty, Spicy, Sticky Chicken, Sweet and Spicy Glazed Salmon or just about any other main dish imaginable. My boys went a little crazy over this rice and repeatedly told me how much they liked it.

* I've made this rice both with and without the cilantro and lime. Both versions were tasty. The cilantro lime version was preferred by the adults and the kids preferred the more simple and sweet version.

Pineapple Rice with Cilantro and Lime
Yield: 4 servings

1 cup jasmine rice
3/4 cup pineapple juice
1 cup water
1/2 cup frozen pineapple tidbits (if using canned tidbits, reduce the above water by 1/4 cup)
1/2 teaspoon kosher salt
4 green onions, very thinly sliced, about 1/4 cup
Optional: 2-4 tablespoons chopped cilantro and 2-4 tablespoons fresh squeezed lime juice, adjust both to taste

Combine the rice, juice, water, pineapple and salt in a large saucepan or skillet with a lid. Cover and bring to a boil. Stir and then reduce to a low simmer and cover with lid. Simmer for 16-18 minutes, until the rice is tender. Stir to fluff the rice and add the onions, along with the cilantro and lime if desired. Enjoy!


Click here for printable recipe

ONE YEAR AGO TODAY: Meatloaf with Balsamic Glaze

Hawaiian Huli Huli Chicken

To contact us Click HERE
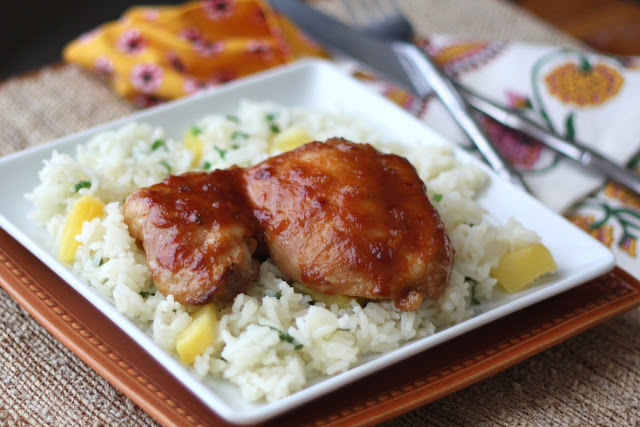
Huli Huli Chicken is Hawaii's version of barbecue chicken. This is tangy, sweet, marinated and then glazed chicken, loaded with the flavors of pineapple, ginger, brown sugar and soy sauce. I ran across this recipe over a year ago and pinned it to try someday. I'm not sure how "someday" became a year and a half later, but I'm glad it was finally made.

I've made this chicken twice in two weeks and each time, the whole family raved about it. Served with Cilantro and Lime Pineapple Rice or with Simple Asian Rice and Roasted Green Beans, this was a great meal that is guaranteed to be made over and over again in my house.

This chicken can be made in the oven or on the grill. The directions below are for oven-broiling. If you are using bone-in chicken with skin, I recommend grilling it so that the skin will be crispy. The grilled bone-in chicken thighs were our favorite, but the broiled boneless skinless ones were a very close second. Traditional Huli Huli Chicken is smoked or cooked on a rotisserie. If you have those methods available to you, definitely use them!

Hawaiian Huli Huli Chicken
recipe adapted from Cooks Illustrated via Forks Knives and Spades
Yield: 6 servings

Marinade Ingredients:
2 cups water
1 cup soy sauce
6 garlic cloves
1 tablespoon grated fresh ginger (I grated my frozen ginger on a microplane.)
2-3 lbs boneless skinless chicken thighs (any kind of chicken will work, adjust times and methods accordingly)

Glaze Ingredients:
2 tablespoons grated fresh ginger
2 teaspoons garlic chili paste
4 cloves garlic, minced
2 cups pineapple juice
1/4 cup light or dark brown sugar
1/4 cup soy sauce
1/4 cup ketchup
1/4 cup rice vinegar

Combine all of the marinade ingredients and pour over the chicken in an airtight container or gallon size ziploc bag. Refrigerate for at least an hour and up to 24 hours. I typically marinate this chicken for 3-4 hours.

When ready to cook the chicken, allow it to rest on the counter while you prepare the glaze. Place all the glaze ingredients in a saucepan and bring to a boil over high heat. Reduce the heat to medium and simmer for 15-20 minutes, until it has reduced and thickened. (If you are short on time, you can whisk 2 teaspoons cornstarch with a couple tablespoons water and then pour into the glaze. Simmer for just a couple minutes and then remove from the heat when it has thickened.)

GRILLING DIRECTIONS: Preheat the grill to high and then reduce to medium low when ready to grill. Grill the chicken covered for about 20-30 minutes, until chicken is slightly browned on the bottom. Turn the chicken over and cover grill again.  The skin will crisp up and brown.  You want the thigh meat to register 170-175 degrees. Remove from the grill and brush generously with half of the glaze. Let rest for at least 5 minutes and then serve along with the rest of the glaze.

OVEN DIRECTIONS: Preheat the oven to broil. Set aside 1/2 cup of the glaze for serving. Place the chicken on a wire rack over a large baking sheet. Brush the chicken generously with the glaze and then broil for 5 minutes. Turn each piece over and brush with glaze again. Broil 5 more minutes and then turn each piece over again. Brush with glaze once more and broil 1-3 minutes longer. Test the meat to make sure it is fully cooked before removing from the oven. Let rest a few minutes before serving along with the remaining glaze. Enjoy!


Click here for printable recipe

ONE YEAR AGO TODAY: Roasted Brussels Sprouts with Apples and Bacon

24 Şubat 2013 Pazar

Pumpkin Pie (with Trader Joe's Shelf Stable Whipping Cream)

To contact us Click HERE
Pumpkin PiePumpkin Pie
Happy Thanksgiving! I still can't believe it's already Thanksgiving and the whole holiday season. Has this year been flying by? I think it's on overdrive or something.

Here is a simple Pumpkin Pie recipe. It's adapted from the Libby recipe on the can, but I used some brown sugar and extra yolk.

Friendsgiving Dinner at Dave & Phil'sI topped it with this new Trader Joe's product. It is ultra pasteurized whipping cream. You can keep it on the shelf until you need it (refrigerate for at least 6 hours before use). It contains cream and carrageenan so it's been prepared for shelf stable-ness (sure, that's a word). I whipped it by hand at Friendsgiving (with some super fine sugar and vanilla), and it takes longer to whip than regular cream. The Kitchn has this review of the $1.29 product...I'm definitely going to keep some in the fridge in case I run out of regular cream.

Pumpkin PieRecipe:
Pie Crust (for one 9" pie crust)
1 1/4 c all-purpose flour
1/4 t salt
1 t sugar
4 ounces/1 stick butter
3 to 4 T ice water

Using your fingers, quickly cut in butter until the mixture has the consistency of wet sand. Add water until dough just holds together. How much water you use can depend on the humidity in the air. Form into a disc, wrap in plastic wrap and refrigerate for 1 hour. Then roll out as needed for your pie.

Pie:
1/2 cup brown sugar
1/4 cup white sugar
1 teaspoon ground cinnamon
1/2 teaspoon salt
2 teaspoons Trader Joe's Pumpkin Spice
2 large eggs
1 egg yolk
1 can (15 oz.) pumpkin puree (NOT the pumpkin pie mix)
1 can (12 fl. oz.) evaporated milk
1 unbaked 9-inch (4-cup volume) deep-dish pie shell

Prep: Preheat oven to 425° F oven.
1. Combine sugar, cinnamon, salt, ginger and cloves in small bowl.
2. In a large bowl, whisk eggs together.
3. Stir in pumpkin and sugar-spice mixture into large bowl with eggs.
4. Gradually stir in evaporated milk.
5. Pour mixture into unbaked pie shell. Put pie on a cookie sheet for easy transport into oven.
6. Bake in preheated 425° F oven for 15 minutes. Reduce temperature to 350° F; bake for 40 to 50 minutes or until knife inserted near center comes out clean.
7. Cool on wire rack for 2 hours. Serve immediately or refrigerate.
8. Top with whipped cream before serving.Pin It!

The Food Librarian's Gift Ideas 2012

To contact us Click HERE
Season's Greetings! Seriously can't believe it is December 1st already. Haven't started my holiday shopping yet...have you? Anyway, here are some things that I own and can't live without, or can't wait to explore that someone in your life may want. I can't guarantee that this will be the most awesome gift for your friends and family...but it may give you an idea for things to buy For Yourself. :) Remember to treat yourself this holiday season too!

It's a pretty random list... here goes (click on links for Amazon pages - full disclosure: I'm part of the Amazon affiliate program and get pennies if you happen to purchase items from this link...and I end up buying more cookbooks! Ah, the circle of life :)

Gift Guide 2011\Cookbooks - For the Baker of all levels:
Baking: From My Home to Yours by Dorie Greenspan
If you've followed my blog, you know this book is a huge part! I was part of the Tuesdays with Dorie group and we baked our way through this book. I consider it a classic, and perfect for both the beginning baker and expert. Dorie Greenspan is amazing...she has very good instructions and wonderful flavor combos. This collage is just a few of the things I made from the book!

Tuesdays with Dorie CollageSome of the recipes from Dorie's book: Baking: From My Home to Yours

For the more advanced baker: Bouchon Bakery - This new book by Bouchon Bakery is beautiful. I haven't baked anything from it, but can't wait. Fortunately, Bouchon had a pop-up bakery in Beverly Hills (now they have a permanent bakery) and I went on my 40th birthday for delicious cookies and signature bouchon "cork" brownies. Everything is in weights and they have a chapter about throwing out your measuring cups. Woo hoo...speaking my language.
A few more books that I use a lot:
The Art and Soul of Baking - This is a great book with lots of instruction and easy to make recipe. It's by Sur la Table and pastry chef Cindy Mushet. Some of the items I've made include Orange Chocolate Chip muffins, Nectarine Upside-Down muffins, and Chocolate Chip Toffee scones.

Flour: Spectacular Recipes from Boston's Flour Bakery + Cafe - Oh man, I love this bakery and this book. Joanne Chang has some detailed instructions and very delicious recipes. The yellow cake is worth buying this book alone. And the lemon ginger scones? Please. Just add it to your cart already.

Sarabeth's Bakery: From My Hands to Yours - This book came out in 2010 and I find myself reading it often. Sarabeth Levine has her bakery in New York...and until I get myself there, I'll just have to bake up a lot of yummy desserts from her book. 
Gift Guide 2011Mochi: recipes from savory to sweet! by JustJenn Fujikawa ($12.50). My friend JustJenn has this great recipe book of all mochi related recipes! From Savory to Sweet! Get your mochi on this holiday season. JustJenn is so creative and makes awesome recipes - you'll really enjoy this book!
Gift Guide 2011Salter 3003 Aquatronic Glass Electronic Kitchen Scale (about $40)
Speaking of scales, I've had this one for a few years and love it. It easily switches from grams to ounces, and  has large numbers. Weighing ingredients is much faster and saves washing dishes. Luckily, more cookbooks are published with weights, as well as food sections of newspapers like the Los Angeles Times.

Gift Guide 2011Portable Speaker  ($15-20 Available in Blue, Black, Red and Silver)When I bake, I love listening to audiobooks. However, I'd rather not have headphones in my ears (have you caught the cords on a drawer and have them yanked from your ears? Totally sucks). This cute little plug-in speaker does the trick. My colleague uses it with her iPad to watch movies in bed, and another friend uses it in her car. It charges via USB on your computer, and the charge lasts awhile.

Roku HD Streaming Player
Do you have Netflix streaming, Amazon Prime or watch Amazon videos or Hulu? This really small Roku box lets you stream videos via WiFi. It's way cool. Most of my friends have an XBox or Blueray player that will stream videos to their TV, but I don't have those fun things. This box works great, and takes very little space. Before I got it, I bought a DVD player with streaming from Costco. It wasn't set up for Amazon Video so I would have to open a browser, use a little remote without a keyboard and it didn't work great. The Roku has it set up to work with the major streaming players so you don't go crazy.

P.S. Thanks to my twitter buddy Erica @epeureka for helping me find the remote too! I tweeted, "If I were my Roku remote, where would I be?" and she said, "Couch cushion crack." Score! (And I found some lose change too).
They have a bunch of different types of Roku... but I really love it for streaming. It's amazing that something so small can deliver my favorite shows! :)
For the runner:
While I'm hardly a big time runner, here are a few things I wear while running so I'm not hit by a car. Because that would suck. Big time.


Road ID Engraved Emergency Contact Wristband ($20) - I run with my phone and dog. But if something happens, my phone has a pattern lock, and my dog doesn't talk. So I have a pink Road ID that can talk for me should that ever happen. This would make a very valuable gift to anyone who exercises or even just walks the dog.Road ID - Reflective Ankle Bands (Pair) ($10)


Traveler stuff:
This is a great bag. It is called the Patagonia MLC or Maximum Legal Carry-On bag. It has a zillion zippered pouches and can be carried like a brief case or worn like a messenger bag or backpack. My friend Sumi has taken hers all over the world, and well, I've taken mine to San Francisco and the east coast. It's perfect for probably up to 4 days, if you don't have too many shoes. It's $160 but I think it's going to last many years and miles.

Donations:
Of course, the best gift is giving to others. Consider a donation to your friend's favorite charity - service organizations, libraries, museums, zoos, and so many worthy causes!

Updated: See part 2 of my gift list here. Pin It!